Crayola Light-Up Glow Boards and Frustrated Total Internal Reflection
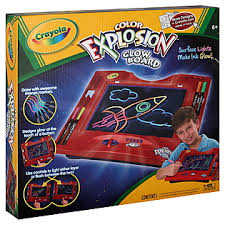 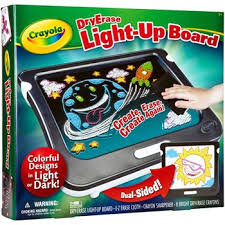
[Shopping List: Crayola "Color Explosion Glow Board", "Dry Erase Light-Up Board" and a few other variations. $25-30 in most toy stores.]
- Draw or write on the clear plastic plate or screen using the markers or crayons included.
- Insert the screen into the special frame and press the switch to turn on the internal LED lights.
- Whatever you have drawn will instantly glow in bright "neon" colors, but almost none of the internal light appears to emerge from any of the clear areas on the screen.
What's Happening: You may have also seen screens like this is restaurants or stores, where the bright glowing letters really attract your attention. If you examine the screen or plate while inside its special frame you will notice that there are 4-8 small ultraviolet (UV) light emitting diodes (LED's) positioned so that they shine their light into the edges of the clear plastic plate. Because the plate is relatively thin (~0.25") all of the light rays inside are trapped and cannot escape through the front or back faces. Light rays can only escape though the edges, as evidenced by the bright glow you should see all around the perimeter of the plate. In fact, if you hold your finger close to an edge you can see just how much light emerges there. All of the light is trapped at the front and back faces because of a special property of all electromagnetic radiation (of which visible and UV light is a subset) called total internal reflection, illustrated nicely below.

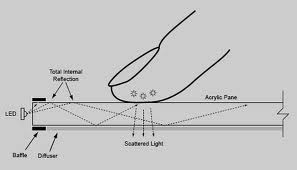
The blue rectangle (labelled "water" in this borrowed drawing) is a cross-sectional view of our clear plastic plate, and the UV LED's in the frame would be positioned at the left. Once inside the plate, if a light ray strikes the top surface at any angle less than the critical angle &Thetac , such as &Theta1 , it will emerge at a larger angle (&Theta2). This is simple refraction. [Note that any light ray striking the surface at exactly the critical angle will be refracted at 90°, or parallel to the surface] But in our case the LED's are placed at the left edge, and far enough away so that very few if any light rays will strike the top (or bottom) surface at less than this critical angle (any that do will escape immediately from the extreme left side). Thus essentially all of the light rays will be totally reflected back into the plate any time they strike the surface, until they finally reach the vertical right edge, where they are now likely to strike the interface at an angle less than &Thetac and escape from the edge. The plate is acting as a light pipe, basically a simpler version of a fiber optic cable. BTW- n1 and n2 refer to the index of refraction of plastic and air respectively, sort of a measure of the optical "density" of the material. Total internal reflection can only occur when n1> n2, i.e. when the light rays travel from an optically denser material into a less dense one, never the other way around.
Okay, this is certainly some cool science taking place for such a simple looking toy, but it gets even better. This is only half of the story (or rather one third), because if all of the light rays are trapped inside the plastic plate, what makes the drawings on the surface glow? And if the fairly dim LED light contains only UV (with a bit of violet that we can see), why do the drawings glow with so many bright new colors? It turns out that total internal reflection is actually a little more complicated. To fully understand what is happening requires some pretty scary math and something called the evanescent wave (check the Wikipedia reference below if you really want to dive in), but basically there is still some probability of a light wave briefly crossing the plastic-air interface before it's totally reflected (the evanescent wave). If another material with an index of refraction greater than air is placed close enough to the surface (within a few wavelengths of the light), then light energy can actually be tranferred through this evanescent wave, escaping from the plate. This is similar to quantum tunneling for electrons, and called frustrated total internal reflection (FTIR). By drawing on the surface, the ink or crayon material is thus close enough (at the molecular level) to cause this "tunneling" of energy, and the light that escapes is scattered by the ink molecules, which would allow us to see it except that most of the energy is UV, which the human eye can't see. That brings us to the final piece of our puzzle. The inks and crayons contain various fluorescent dyes, which absorb the UV energy that we can't see and re-emit it at colors which we can see. That's why the colors seem to glow- they are in fact glowing with their own light rather than simply reflecting the UV light from the LED's. And that really is a LOT of science for a toy!
Variations and Related Activities: For more fun experiments involving reflection, refraction and total internal reflection check out our "Jell-O Optics, Total Internal Reflection and Fiber Optic" activity, which also includes a cool trick illustrating frustrated total internal reflection. Fill a clear drinking glass with water (or you can use an aquarium) and position your eyes 6"-12" above the water surface from the front, as shown in the photo below. Now slowly slide your fingers down the back of the glass(on the outside, not in the water!) Notice that as your fingers drop below the level of the water surface they seem to disappear. If you lower your eyes and look through the glass horizontally you can see them (though they will be quite distorted due to the glass and water acting as a crude lens), but from above they disappear from your view. This is caused by total internal reflection. The light rays that scatter off your finger refract from air into the water just fine, but as they try to travel from the water back into air the rays are totally reflected back into the water at the surface, i.e. they can't reach your eyes and therefore you can't see your fingers. Now repeat this experiment, but this time get your fingers good and wet in the water first, then press them tightly against the glass (from the outside, but below the level of the water surface, just as before). Now you can clearly see your fingers, or at least any portions that are touching the glass. Move them away from the glass and they disappear once again. You've just demonstrated frustrated total internal reflection. You can do the same trick with a wet dollar bill instead of your fingers.
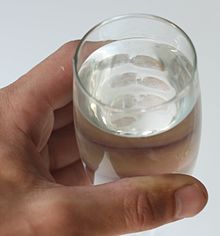
A slight variation of this trick illustrates a useful application of FTIR. Repeat the trick with dry fingers, but this time gently press only your fingertips against the glass. If you look closely you can clearly see fingerprints in the glass. This is a consequence of FTIR once again- the ridges of your fingerprints are in close enough contact with the air-glass interface to allow light rays passing through the water, hit your fingertips, bounce off, then pass back through the glass and water at the proper angle necessary to reach your eyes.They appear bright or white. At the same time the valleys of your fingerprints are not close enough to the air-glass interface for FTIR to occur, so no light rays from the valleys reach your eyes, and they appear dark. This technology is being used to make sensors that can quickly image and analyze fingerprints without the need for ink or other complicated procedures, or to detect multiple finger contacts on multi-touch computer screens as illustrated in the diagram below.
Links to more information and activities
Wikipedia article on total internal reflection and FTIR:
http://en.wikipedia.org/wiki/Total_internal_reflection
FTIR for multi-touch screens:
http://cs.nyu.edu/~jhan/ftirsense/
http://wiki.nuigroup.com/FTIR
|

